软件安装(Ubuntu)
本篇主要讲解 ubuntu 中软件的安装、apt 的源、内网部署案例(graylog 为例),最后是 python 开发准备。
apt 和 rpm
在linux 第一篇我们知道如果机器是 ubuntu 则可用 apt-get/dpkg 安装软件,如果是centos 则可用 rpm/yum。
apt 和 rpm 都是软件包管理工具。
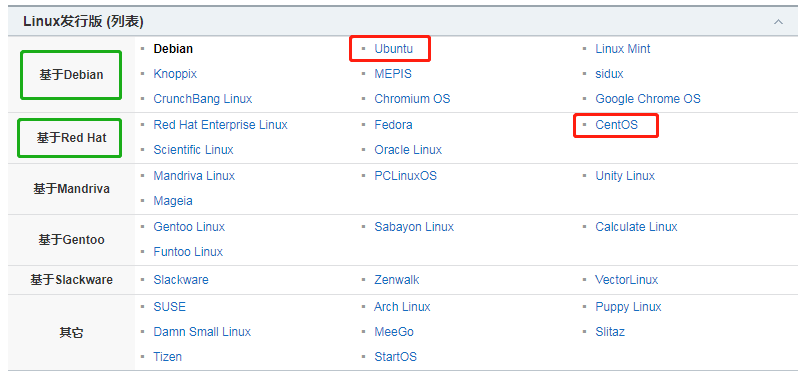
Linux有上百种不同的发行版,如基于社区开发的debian、archlinux,和基于商业开发的Red Hat Enterprise Linux、SUSE、Oracle Linux等。

注:网友说 apt 能用于 debian 系列,rpm 能用于 Red Hat 系列(笔者未亲测)。
rpm 包可转为 deb 包。笔者安装 graylog 时,最初只找到 graylog-sidecar-repository.rpm 包,于是使用 alien 将其转为 deb,然后在使用 dpkg 安装,并成功生效。尽量用原生的 deb 包。
apt的源
以 ubuntu 为例,里面有个文件 /etc/apt/sources.list 指定了软件仓库的地址(美国)。
通过 apt-get 下载软件就是去到美国,从而导致网络速度缓慢以及不稳定。
国内有个网站(清华大学开源软件镜像站)利用镜像技术同步了美国那边的软件仓库。我们将美国的源替换成清华的源以后,下次下载软件就无须去出国,解决速度以及网络的不稳定。
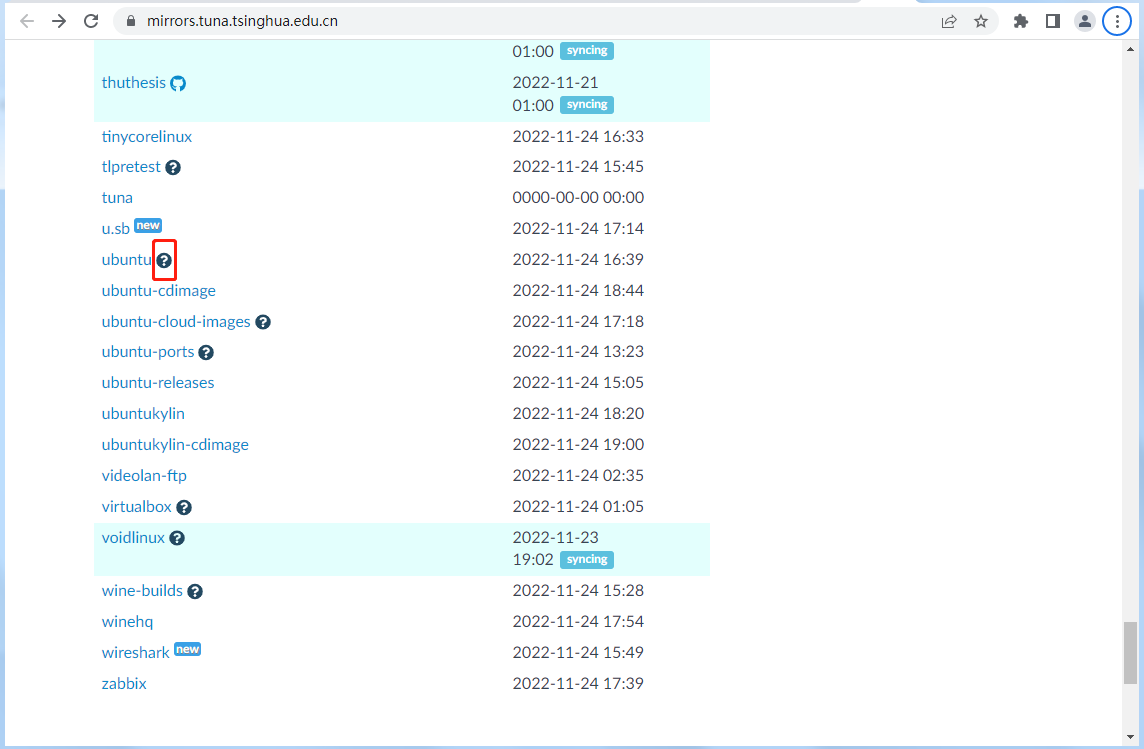
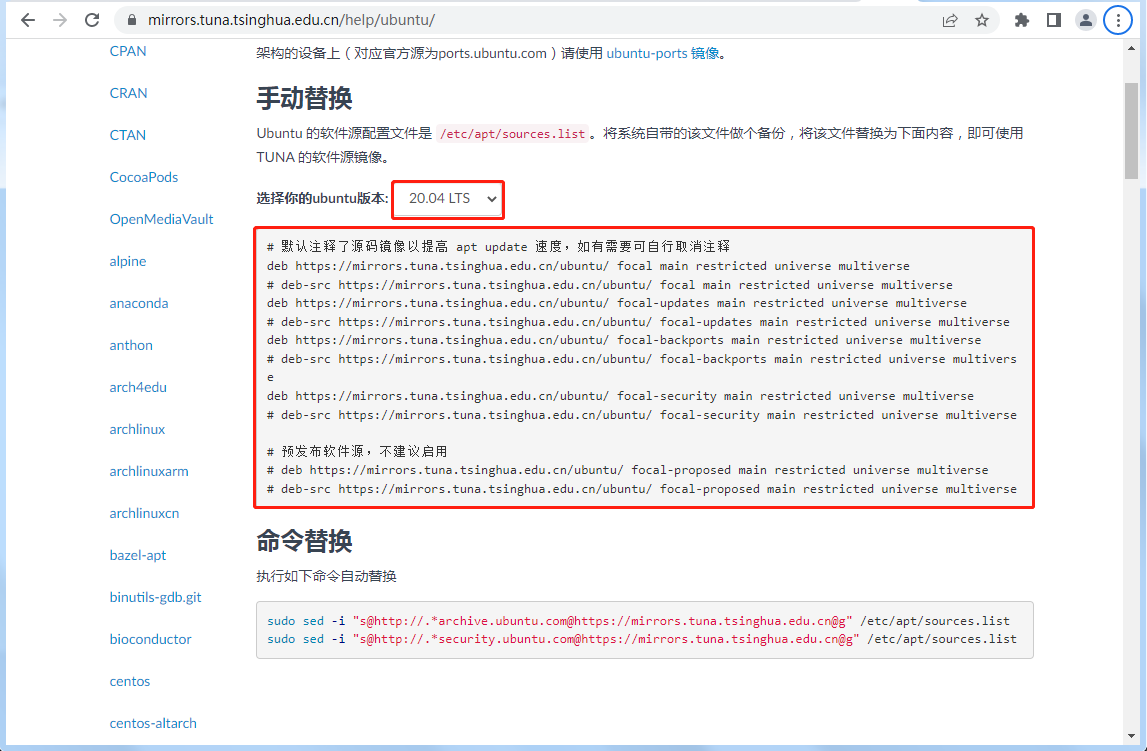
进入华大学开源软件镜像站,找到自己的操作系统(例如 Ubuntu),点击问号(?)进入后选择对应的版本(20.0.4),复制源。就像这样:


备份 sources.list 并替换成新的源:
// 复制
root@linux:/etc/apt# cp sources.list sources.list.bak
// 清空 sources.list
root@linux:/etc/apt# echo '' > sources.list
// 输入清华源,保存
root@linux:/etc/apt# vim sources.list
# 默认注释了源码镜像以提高 apt update 速度,如有需要可自行取消注释
deb https://mirrors.tuna.tsinghua.edu.cn/ubuntu/ jammy main restricted universe multiverse
# deb-src https://mirrors.tuna.tsinghua.edu.cn/ubuntu/ jammy main restricted universe multiverse
deb https://mirrors.tuna.tsinghua.edu.cn/ubuntu/ jammy-updates main restricted universe multiverse
# deb-src https://mirrors.tuna.tsinghua.edu.cn/ubuntu/ jammy-updates main restricted universe multiverse
deb https://mirrors.tuna.tsinghua.edu.cn/ubuntu/ jammy-backports main restricted universe multiverse
# deb-src https://mirrors.tuna.tsinghua.edu.cn/ubuntu/ jammy-backports main restricted universe multiverse
deb https://mirrors.tuna.tsinghua.edu.cn/ubuntu/ jammy-security main restricted universe multiverse
# deb-src https://mirrors.tuna.tsinghua.edu.cn/ubuntu/ jammy-security main restricted universe multiverse
# 预发布软件源,不建议启用
# deb https://mirrors.tuna.tsinghua.edu.cn/ubuntu/ jammy-proposed main restricted universe multiverse
# deb-src https://mirrors.tuna.tsinghua.edu.cn/ubuntu/ jammy-proposed main restricted universe multiverse
最后更新源 apt-get update。
apt 卸载 vim
通过 apt-get remove vim 卸载 vim:
root@linux:/home/pjl# apt-get remove vim
Reading package lists... Done
Building dependency tree
Reading state information... Done
The following package was automatically installed and is no longer required:
  vim-runtime
Use 'apt autoremove' to remove it.
The following packages will be REMOVED:
  vim
0 upgraded, 0 newly installed, 1 to remove and 11 not upgraded.
After this operation, 3,112 kB disk space will be freed.
Do you want to continue? [Y/n] y
(Reading database ... 364122 files and directories currently installed.)
Removing vim (2:8.1.2269-1ubuntu5.9) ...
update-alternatives: using /usr/bin/vim.tiny to provide /usr/bin/vi (vi) in auto mode
update-alternatives: using /usr/bin/vim.tiny to provide /usr/bin/view (view) in auto mode
update-alternatives: using /usr/bin/vim.tiny to provide /usr/bin/ex (ex) in auto mode
update-alternatives: using /usr/bin/vim.tiny to provide /usr/bin/rview (rview) in auto mode
再次输入 vim,提示 vim 命令找不到,并给了一些推荐:
root@linux:/home/pjl# vim
Command 'vim' not found, but can be installed with:
apt install vim         # version 2:8.1.2269-1ubuntu5.9, or
apt install vim-tiny    # version 2:8.1.2269-1ubuntu5.9
apt install vim-athena  # version 2:8.1.2269-1ubuntu5.9
apt install vim-gtk3    # version 2:8.1.2269-1ubuntu5.9
apt install vim-nox     # version 2:8.1.2269-1ubuntu5.9
apt install neovim      # version 0.4.3-3
apt 安装 vim
通过 apt install vim 安装 vim:
root@linux:/# apt install vim
Reading package lists... Done
Building dependency tree
Reading state information... Done
Suggested packages:
  ctags vim-doc vim-scripts
The following NEW packages will be installed:
  vim
0 upgraded, 1 newly installed, 0 to remove and 148 not upgraded.
Need to get 0 B/1,238 kB of archives.
After this operation, 3,112 kB of additional disk space will be used.
Selecting previously unselected package vim.
(Reading database ... 364113 files and directories currently installed.)
Preparing to unpack .../vim_2%3a8.1.2269-1ubuntu5.9_amd64.deb ...
Unpacking vim (2:8.1.2269-1ubuntu5.9) ...
Setting up vim (2:8.1.2269-1ubuntu5.9) ...
update-alternatives: using /usr/bin/vim.basic to provide /usr/bin/vim (vim) in auto mode
...
安装成功:
root@linux:/home/pjl# vim --help
VIM - Vi IMproved 8.1 (2018 May 18, compiled Sep 19 2022 04:59:57)
Usage: vim [arguments] [file ..]       edit specified file(s)
   or: vim [arguments] -               read text from stdin
   or: vim [arguments] -t tag          edit file where tag is defined
   or: vim [arguments] -q [errorfile]  edit file with first error
...
查看安装包信息
通过 apt-cache show vim 查看 vim 安装包的信息。例如架构(Architecture)、版本(Version)、描述(Description)…
root@linux:/# apt-cache show vim
Package: vim
Architecture: amd64
Version: 2:8.1.2269-1ubuntu5.9
Priority: optional
Section: editors
Origin: Ubuntu
Maintainer: Ubuntu Developers <ubuntu-devel-discuss@lists.ubuntu.com>
Original-Maintainer: Debian Vim Maintainers <pkg-vim-maintainers@lists.alioth.debian.org>
Bugs: https://bugs.launchpad.net/ubuntu/+filebug
Installed-Size: 3039
Provides: editor
Depends: vim-common (= 2:8.1.2269-1ubuntu5.9), vim-runtime (= 2:8.1.2269-1ubuntu5.9), libacl1 (>= 2.2.23), libc6 (>= 2.29), libcanberra0 (>= 0.2), libgpm2 (>= 1.20.7), libpython3.8 (>= 3.8.2), libselinux1 (>= 1.32), libtinfo6 (>= 6)
Suggests: ctags, vim-doc, vim-scripts
Filename: pool/main/v/vim/vim_8.1.2269-1ubuntu5.9_amd64.deb
Size: 1237920
...
Homepage: https://www.vim.org/
Description-en: Vi IMproved - enhanced vi editor
 Vim is an almost compatible version of the UNIX editor Vi.
 .
 Many new features have been added: multi level undo, syntax
 highlighting, command line history, on-line help, filename
 completion, block operations, folding, Unicode support, etc.
 .
 This package contains a version of vim compiled with a rather
 standard set of features.  This package does not provide a GUI
 version of Vim.  See the other vim-* packages if you need more
 (or less).
Description-md5: 59e8b8f7757db8b53566d5d119872de8
Task: server, cloud-image, lubuntu-desktop
内网部署 graylog
graylog 是一个日志系统,已在外网通过 docker-compose 安装成功。就像这样:

有关 graylog 的更详细介绍将另开博文,这里只需知道我们需要将 3 个镜像导出,以及离线下载好 sidecar 和 filebeat。
Tip:Compose 是用于定义和运行多容器 Docker 应用程序的工具。通过 Compose,您可以使用 YML 文件来配置应用程序需要的所有服务。然后,使用一个命令,就可以从 YML 文件配置中创建并启动所有服务。笔者 docker 和 docker-compsose 版本如下:
root@linux:/# docker -v
Docker version 20.10.14, build a224086
root@linux:/# docker-compose -v
docker-compose version 1.25.0, build unknown
导出 6 个包
现在运行了三个容器:
- graylog/graylog:4.3
- docker.elastic.co/elasticsearch/elasticsearch-oss:7.10.2
- mongo:4.2
root@linux:/home/pjl/graylog-offline# docker ps
CONTAINER ID   IMAGE                                                      COMMAND                  CREATED        STATUS                  PORTS                                                                                                                                                                                                                                                                                                                 NAMES
78b3ded2a509   graylog/graylog:4.3                                        "/usr/bin/tini -- wa…"   10 hours ago   Up 10 hours (healthy)   0.0.0.0:1514->1514/tcp, 0.0.0.0:1514->1514/udp, :::1514->1514/tcp, :::1514->1514/udp, 0.0.0.0:5044->5044/tcp, 0.0.0.0:5044->5044/udp, :::5044->5044/tcp, :::5044->5044/udp, 0.0.0.0:12201->12201/tcp, 0.0.0.0:12201->12201/udp, :::12201->12201/tcp, :::12201->12201/udp, 0.0.0.0:9000->9000/tcp, :::9300->9000/tcp   graylog-lixian_graylog_1
99f7d32835b3   docker.elastic.co/elasticsearch/elasticsearch-oss:7.10.2   "/tini -- /usr/local…"   10 hours ago   Up 10 hours             9200/tcp, 9300/tcp                                                                                                                                                                                                                                                                                                    graylog-lixian_elasticsearch_1
fed264cb8890   mongo:4.2                                                  "docker-entrypoint.s…"   10 hours ago   Up 10 hours             27017/tcp                                                                                                                                                                                                                                                                                                             graylog-lixian_mongodb_1
使用 docker save 导出这三个镜像:
root@linux:/home/pjl/graylog-offline# docker save --help
Usage:  docker save [OPTIONS] IMAGE [IMAGE...]
Save one or more images to a tar archive (streamed to STDOUT by default)
Options:
  -o, --output string   Write to a file, instead of STDOUT
root@linux:/home/pjl/graylog-offline# docker save -o graylog.tar graylog/graylog:4.3
root@linux:/home/pjl/graylog-offline# docker save -o es.tar docker.elastic.co/elasticsearch/elasticsearch-oss:7.10.2
root@linux:/home/pjl/graylog-offline# docker save -o mongo.tar mongo:4.2
root@linux:/home/pjl/graylog-offline# ll
total 2026416
-rw------- 1 root     root     709774336 11月 19 19:53 es.tar
-rw------- 1 root     root     517527040 11月 19 19:52 graylog.tar
-rw------- 1 root     root     392081408 11月 19 19:54 mongo.tar
通过 wget 下载 graylog-sidecar-repository_1-2_all.deb:
Tip: wget 是一个从网络上自动下载文件的自由工具,支持通过 HTTP、HTTPS、FTP 三个最常见的 TCP/IP协议 下载
root@linux:/home/pjl/graylog-offline# wget https://packages.graylog2.org/repo/packages/graylog-sidecar-repository_1-2_all.deb
--2022-11-19 08:42:38--  https://packages.graylog2.org/repo/packages/graylog-sidecar-repository_1-2_all.deb
Resolving packages.graylog2.org (packages.graylog2.org)... 54.157.4.65, 54.196.16.164, 34.201.80.84, ...
Connecting to packages.graylog2.org (packages.graylog2.org)|54.157.4.65|:443... connected.
HTTP request sent, awaiting response... 302 Found
Location: https://graylog-package-repository.s3.eu-west-1.amazonaws.com/packages/graylog-sidecar-repository_1-2_all.deb?X-Amz-Algorithm=AWS4-HMAC-SHA256&X-Amz-Date=20221125T004248Z&X-Amz-SignedHeaders=host&X-Amz-Expires=600&X-Amz-Credential=AKIAIJSI6MCSPXFVDPIA%2F20221125%2Feu-west-1%2Fs3%2Faws4_request&X-Amz-Signature=71d979cfb4a02e437c6bc66501c18519ded1ca6d3013f92e49e3a3a0c7c56817 [following]
--2022-11-19 08:42:48--  https://graylog-package-repository.s3.eu-west-1.amazonaws.com/packages/graylog-sidecar-repository_1-2_all.deb?X-Amz-Algorithm=AWS4-HMAC-SHA256&X-Amz-Date=20221125T004248Z&X-Amz-SignedHeaders=host&X-Amz-Expires=600&X-Amz-Credential=AKIAIJSI6MCSPXFVDPIA%2F20221125%2Feu-west-1%2Fs3%2Faws4_request&X-Amz-Signature=71d979cfb4a02e437c6bc66501c18519ded1ca6d3013f92e49e3a3a0c7c56817
Resolving graylog-package-repository.s3.eu-west-1.amazonaws.com (graylog-package-repository.s3.eu-west-1.amazonaws.com)... 52.92.16.146, 52.218.37.32, 52.218.88.136, ...
Connecting to graylog-package-repository.s3.eu-west-1.amazonaws.com (graylog-package-repository.s3.eu-west-1.amazonaws.com)|52.92.16.146|:443... connected.
HTTP request sent, awaiting response... 200 OK
Length: 2002 (2.0K) [application/x-debian-package]
Saving to: ‘graylog-sidecar-repository_1-2_all.deb’
graylog-sidecar-repository_1-2_all.deb                    100%[====================================================================================================================================>]   1.96K  --.-KB/s    in 0.001s
2022-11-19 08:42:49 (1.37 MB/s) - ‘graylog-sidecar-repository_1-2_all.deb’ saved [2002/2002]
官网提示的下载 apt-get install graylog-sidecar,我们使用 download 参数下载 deb 包:
root@linux:/home/pjl/graylog-offline# apt-get download graylog-sidecar
Get:1 https://packages.graylog2.org/repo/debian sidecar-stable/1.2 amd64 graylog-sidecar amd64 1.2.0-1 [2,791 kB]
Fetched 2,791 kB in 17s (160 kB/s)
W: Download is performed unsandboxed as root as file '/home/pjl/graylog-offline/graylog-sidecar_1.2.0-1_amd64.deb' couldn't be accessed by user '_apt'. - pkgAcquire::Run (13: Permission denied)
filebeat 直接去官网下载deb(笔者选择deb x86_64),版本和已按照的保持相同:
root@linux:/home/pjl/graylog-offline# dpkg -l |grep filebeat
ii  filebeat                                   7.13.2                                amd64        Filebeat sends log files to Logstash or directly to Elasticsearch.
所有的 6 个包都已准备完毕。
root@linux:/home/pjl/graylog-offline# ll
total 1619652
-rw-r--r-- 1 root     root          1766 11月 19 09:06 docker-compose.yml
-rw------- 1 root     root     709774336 11月 19 19:53 es.tar
-rw-r--r-- 1 root     root      36311722 11月 19 08:54 filebeat-7.13.2-amd64.deb
-rw-r--r-- 1 root     root       2790802 6月   2 17:28 graylog-sidecar_1.2.0-1_amd64.deb
-rw-r--r-- 1 root     root          2002 6月   2 17:56 graylog-sidecar-repository_1-2_all.deb
-rw------- 1 root     root     517527040 11月 19 19:52 graylog.tar
-rw------- 1 root     root     392081408 11月 19 19:54 mongo.tar
导入 6 个包
将其拷贝到内网,安装即可。步骤如下:
Tip:内网不方便演示,笔者就在外网重新离线安装。笔者也不重新卸载安装 docker 和 docker-compose,如果没有安装这两个软件,命令行输入 docker 或 docker-compose,根据提示安装即可,非常简单。
- 重置环境。关闭服务并删除3个镜像:
root@linux:/home/pjl/graylog-lixian# docker-compose down
Stopping graylog-lixian_graylog_1       ... done
Stopping graylog-lixian_elasticsearch_1 ... done
Stopping graylog-lixian_mongodb_1       ... done
Removing graylog-lixian_graylog_1       ... done
Removing graylog-lixian_elasticsearch_1 ... done
Removing graylog-lixian_mongodb_1       ... done
Removing network graylog-lixian_default
root@linux:/home/pjl/graylog-lixian# docker image rm graylog/graylog:4.3 docker.elastic.co/elasticsearch/elasticsearch-oss:7.10.2 mongo:4.2
Untagged: graylog/graylog:4.3
Deleted: sha256:55ffcbea624710985a23a15f04d118e201073dcd3b7a343f2ab5b534059ab9e0
Deleted: sha256:95636585c59c7d040157088102a02c47796a6f8f4dfb74108865cf2fca817844
Deleted: sha256:cee1ef78449af7fcbace0d38a477bb317202b7b6023215337cb3838464777e0e
Deleted: sha256:5739285dc8a194529deb390bca84c900f7d526cd767b5ad5d8551effb1af9b49
Deleted: sha256:ebb1b00be0cd803054a1c79ff5f2d5e41f931ab9c3079dbf54a7b5d5ad1315ad
Deleted: sha256:3de2a1ad54fe9f36042083de5f6983e060a88690521f2d9774fa9ddd1aa2ffcb
Deleted: sha256:e8154d0a37c1267defc8bfffb52cab56929897b2e7b20385c9829f11c97ae02e
Deleted: sha256:a4e4bc09e93e3e6cbc6e7be2240ed9b3d78f8a43e030fe0a860df1526fbd730b
Deleted: sha256:744b10777242203afd599783d96a1e1b56e84eb9552adb0e0137df17498c4d95
Deleted: sha256:7ea4455e747ead87d6cc1c4efaf3a79530a931a0856a9f9ce9ac2d8d45bd3c28
Untagged: docker.elastic.co/elasticsearch/elasticsearch-oss:7.10.2
Untagged: docker.elastic.co/elasticsearch/elasticsearch-oss@sha256:2c257b68f361872e13bdd476cba152e232a314ec61b0eedfc1f71b628ba39432
Deleted: sha256:b313026e6fbdbf01894ef8c67d558d3c7d89c70214d4c9e2a147ba10540a7738
Deleted: sha256:7e5a1b4b267a714d873c14d2c6fdbf6fd6ef0aef36545d1bef536313adc14cee
Deleted: sha256:76d3944a3706d3ebf55d930ea0ea052041e144a565f1d5763361bf6d8067c47d
Deleted: sha256:06f9bf706f6a8ede593fed88436a9378d54565cb46354f0e0d7ca70d3468d256
Deleted: sha256:3858ad285c1b1d644466fac196f84588afcd7e4ccd8e60d1cdfe647240e1f9ac
Deleted: sha256:79a5a63f73ec4cf09eb962b402f4b875e5144b3a3dbf20c4f0b19f16ada87539
Deleted: sha256:c2f6b02ece14735913273b7f7dee602aec5272a5ad6b3edffa01bbebb7ea1016
Deleted: sha256:c258379f39b882c203abb2d395b781a7889f0c13389f9c6f33c5ae6c6d4709de
Deleted: sha256:b00f1ef5af2ecc0886489536d3ea820f99e1de124fa2e1db2ecc9a8da52f6c3f
Deleted: sha256:2653d992f4ef2bfd27f94db643815aa567240c37732cae1405ad1c1309ee9859
Untagged: mongo:4.2
- 通过
docker load -i导入 3 个镜像:
root@linux:/home/pjl/graylog-offline# docker load -i graylog.tar
7ea4455e747e: Loading layer [==================================================>]  80.31MB/80.31MB
8db88cbdad95: Loading layer [==================================================>]  36.61MB/36.61MB
9bc92c3293a3: Loading layer [==================================================>]  108.8MB/108.8MB
acbd873348fa: Loading layer [==================================================>]   2.56kB/2.56kB
bf85b6e40dda: Loading layer [==================================================>]  260.1MB/260.1MB
5f70bf18a086: Loading layer [==================================================>]  1.024kB/1.024kB
8c758c13793c: Loading layer [==================================================>]   31.7MB/31.7MB
899d199c6115: Loading layer [==================================================>]  5.632kB/5.632kB
277e8b048045: Loading layer [==================================================>]   5.12kB/5.12kB
Loaded image: graylog/graylog:4.3
root@linux:/home/pjl/graylog-offline# docker load -i mongo.tar
Loaded image: mongo:4.2
root@linux:/home/pjl/graylog-offline# docker load -i es.tar
2653d992f4ef: Loading layer [==================================================>]  216.5MB/216.5MB
7d054489f6eb: Loading layer [==================================================>]  71.64MB/71.64MB
56319c3e73b9: Loading layer [==================================================>]  314.4kB/314.4kB
ec3900b77411: Loading layer [==================================================>]  420.7MB/420.7MB
719b01194e7c: Loading layer [==================================================>]   25.6kB/25.6kB
02f56ad574d0: Loading layer [==================================================>]  4.608kB/4.608kB
a1b5f2939457: Loading layer [==================================================>]  7.168kB/7.168kB
d66f67be6b73: Loading layer [==================================================>]   55.3kB/55.3kB
0dcc68aca185: Loading layer [==================================================>]  466.4kB/466.4kB
Loaded image: docker.elastic.co/elasticsearch/elasticsearch-oss:7.10.2
- 启动服务即可(可后台启动
docker-compose up -d):
root@linux:/home/pjl/graylog-offline# docker-compose up
Creating network "graylog-offline_default" with the default driver
Creating graylog-offline_elasticsearch_1 ... done
Creating graylog-offline_mongodb_1       ... done
Creating graylog-offline_graylog_1       ... done
...
docker-compose.yml
附上 docker-compose.yml 内容(来自官网):
Tip:修改了 GRAYLOG_HTTP_EXTERNAL_URI,增加了 5044
version: '2'
services:
  # MongoDB: https://hub.docker.com/_/mongo/
  mongodb:
    image: mongo:4.2
    volumes:
      - mongo_data:/data/db
   # Elasticsearch: https://www.elastic.co/guide/en/elasticsearch/reference/7.10/docker.html
  elasticsearch:
    image: docker.elastic.co/elasticsearch/elasticsearch-oss:7.10.2
    volumes:
      - es_data:/usr/share/elasticsearch/data
    environment:
      - http.host=0.0.0.0
      - transport.host=localhost
      - network.host=0.0.0.0
      - "ES_JAVA_OPTS=-Xms512m -Xmx512m"
    ulimits:
      memlock:
        soft: -1
        hard: -1
    mem_limit: 1g
  # Graylog: https://hub.docker.com/r/graylog/graylog/
  graylog:
    image: graylog/graylog:4.3
    volumes:
      - graylog_data:/usr/share/graylog/data
    environment:
      # CHANGE ME (must be at least 16 characters)!
      - GRAYLOG_PASSWORD_SECRET=somepasswordpepper
      # Password: admin
      - GRAYLOG_ROOT_PASSWORD_SHA2=8c6976e5b5410415bde908bd4dee15dfb167a9c873fc4bb8a81f6f2ab448a918
      # 改用自己服务器的 IP
      - GRAYLOG_HTTP_EXTERNAL_URI=http://192.168.1.123:9000/
    entrypoint: /usr/bin/tini -- wait-for-it elasticsearch:9200 --  /docker-entrypoint.sh
    links:
        - mongodb:mongo
        - elasticsearch
    restart: always
    depends_on:
      - mongodb
      - elasticsearch
    ports:
      # Graylog web interface and REST API
      - 9000:9000
      # Syslog TCP
      - 1514:1514
      # Syslog UDP
      - 1514:1514/udp
      # GELF TCP
      - 12201:12201
      # GELF UDP
      - 12201:12201/udp
      # GELF TCP
      - 5044:5044
      - 5044:5044/udp
# Volumes for persisting data, see https://docs.docker.com/engine/admin/volumes/volumes/
volumes:
  mongo_data:
    driver: local
  es_data:
    driver: local
  graylog_data:
    driver: local
ubuntu 下开发 python
ubuntu 自带 python 开发环境(两个版本)。
root@linux:/home/pjl/graylog-lixian# python
Python 2.7.18 (default, Jul  1 2022, 12:27:04)
[GCC 9.4.0] on linux2
Type "help", "copyright", "credits" or "license" for more information.
>>>
root@linux:/home/pjl/graylog-lixian# python3
Python 3.8.10 (default, Jun 22 2022, 20:18:18)
[GCC 9.4.0] on linux
Type "help", "copyright", "credits" or "license" for more information.
>>>
运行一个最简单的 python 程序(hello.py)。请看操作:
root@linux:/home/pjl/graylog-lixian# cat hello.py
print('hello')
root@linux:/home/pjl/graylog-lixian# python hello.py
hello

1、IT大王遵守相关法律法规,由于本站资源全部来源于网络程序/投稿,故资源量太大无法一一准确核实资源侵权的真实性;
2、出于传递信息之目的,故IT大王可能会误刊发损害或影响您的合法权益,请您积极与我们联系处理(所有内容不代表本站观点与立场);
3、因时间、精力有限,我们无法一一核实每一条消息的真实性,但我们会在发布之前尽最大努力来核实这些信息;
4、无论出于何种目的要求本站删除内容,您均需要提供根据国家版权局发布的示范格式
《要求删除或断开链接侵权网络内容的通知》:https://itdw.cn/ziliao/sfgs.pdf,
国家知识产权局《要求删除或断开链接侵权网络内容的通知》填写说明: http://www.ncac.gov.cn/chinacopyright/contents/12227/342400.shtml
未按照国家知识产权局格式通知一律不予处理;请按照此通知格式填写发至本站的邮箱 wl6@163.com